Thursday, January 31, 2008

Step 1: Open the DVD with DVD Shrink


Download and install DVD Shrink.
Run DVD Shrink.
Insert the DVD you want to copy.
Select Open Disc . If you have more than one DVD drive, it will ask which one to use.

The program will analyze the disc. This can take many minutes.

Step 2: Removing Unwanted Features
This is a critical step. Since most DVDs are DVD-9 (8GB) and your blank disc is a DVD-5 (4.7GB) something has to go. Either you need to REMOVE things you don't want (like trailers or extras) and you will need to RECOMPRESS the video of the main movie to fit properly in the remaining space. If you remove something wrong, you can cause the resulting disc not to play right.
Here is the main screen you will see AFTER its done anayzing.

Check to see if the recompression percentage is acceptable. Take a look at the percentage on the top right.

Make sure that you have MAIN MOVIE selected on the left . It should default to that, but double check.
Note: Some movies have TWO copies of the movie on the disc; widescreen and full screen. Typically, you will only want to keep one copy (hopefully the widescreen version). Before continuing, expand the MAIN MOVIE tree and make sure only ONE entry is there.
If there are two, and you want to keep BOTH, you will need to select each one in turn and follow the below steps for EACH entry.
Chances are likely, you only want ONE of them. DVD Shrink doesn't handle this easily at this time. I recommend you use Nero Recode instead. However, you can choose to replace the movie with still images and NO audio to get it the smallest possible.
See below REMOVING EXTRAS.
Remove Audio Tracks you to not want. Most of the time, there will be numerous audio tracks you do not need.

In this sample, we've unchecked EVERYTHING except the English track. You will likely see a very different list on your DVD. You might see a DTS track, several AC3 English tracks (not pointed out as Director Commentary), and several other languages. NORMALLY ... the biggest track in MB (in this case, 354MB) is the best one. If you have a DTS decoder on your home theater, you might ONLY select the DTS track. If you want to make sure it works on all machines, you might want to choose the DTS AND the first English audio track (normally AC3 5.1-ch English). The more you get rid of, the more room is available for the movie - the quality will go up.

Check to see if the recompression percentage is acceptable. (see above)

Remove subtitles. Subtitles are the words that you can turn on (like closed captions) during the movie that show what the actors are saying (or describing noises). Chances are likely you will want to remove them.

While you might be tempted to remove ALL subtitles, I recommend you leave English subtitles. If the movie has a section in a foreign language (like Klingon :), and the movie shows you, in English text on the bottom, the translation, the DVD might use subtitles to display these. Birthday Girl is a good example. If you remove the subtitles, the long scenes in Russian will not be translated for you.

Overcompress/Remove Extras. Many people don't care about extras like trailers, bloopers, featurettes, etc. To get that magic compression percentage up, you might want to overcompress/remove the extras to make MORE room for the movie. Note: If REMOVING extras is your plan, use the Nero Recode tutorial. You can, however, replace the extra with still frames with no audio

You can select each extra (as you can see, they aren't named) and use the preview window at the bottom to see what each extra is. You'll learn by the size (the more you do this) what is a trailer, what is a featurette, etc. Right now, the extra in our example is 184MB.
OVERCOMPRESSIONOnce you select an extra, the Video compression percentage will change, showing you how much DVD Shrink decided to recompress that extra. To make that extra smaller, you'll need to override the Video compression and choose a smaller value.

Change to CUSTOM RATIO, and move the slider to the lowest value. This will make that extra as small as it can be. Remember, you can also remove subtitles and audio tracks from these too (although its rare you will have that sort of option). After changing this to 50.7%, the size of the extra is now 160MB.
REMOVALYou can't really REMOVE the extra, but you CAN replace the whole movie with still blank images, remove ALL the audio and subpictures and make it VERY SMALL.

Change Video to STILL PICTURES. Uncheck all the Audio and Subpictures. You can now see that we've reduced the size to 34MB.
Step 3: The Backup Process
Choose where and how to burn the disc. If you have Nero installed, you can use the Nero engine to write the new DVD directly to your burner, or as an image file. If not, you need to at least select a new folder to put the DVD files.
Double check the other settings. Poke through the other tabs on the Backup window and make sure everything is how you want it.
Hit OK . This will start the process..
The encoder window will appear and show you the remaining time, a preview window, etc. This deprotects, compresses, and otherwise processes the DVD. This can take anywhere from 30 minutes to a couple hours (or more).
If you elected to burn the DVD directly in Nero, then the DVD will burn, and you are done. If not, you have one more chance to make sure the movie is good before you burn it.
I recommend that you always write the movie to the hard drive first (even if its just a Nero Image File - you can mount that as a DVD image and test it out later).
Step 4: Check and Burn The Movie
Load your favorite software and check out the movie. If its acceptable, use your favorite DVD software to write the files to a DVD-Video.

Wednesday, January 23, 2008

CPU Packages Type


1.)S.E.C.C. Package Type

S.E.C.C. is short for Single Edge Contact Cartridge. To connect to the motherboard, the processor is inserted into a slot. Instead of having pins, it uses goldfinger contacts, which the processor uses to carry its signals back and forth. The S.E.C.C. is covered with a metal shell that covers the top of the entire cartridge assembly. The back of the cartridge is a thermal plate that acts as a heatsink. Inside the S.E.C.C., most processors have a printed circuit board called the substrate that links together the processor, the L2 cache and the bus termination circuits. The S.E.C.C. package was used in the Intel Pentium II processors, which have 242 contacts and the Pentium® II Xeon™ and Pentium III Xeon processors, which have 330 contacts.


2.)S.E.C.C.2 Package Type


The S.E.C.C.2 package is similar to the S.E.C.C. package except the S.E.C.C.2 uses less casing and does not include the thermal plate. The S.E.C.C.2 package was used in some later versions of the Pentium II processor and Pentium III processor (242 contacts).


3.S.E.P. Package Type


S.E.P. is short for Single Edge Processor. The S.E.P. package is similar to a S.E.C.C. or S.E.C.C.2 package but it has no covering. In addition, the substrate (circuit board) is visible from the bottom side. The S.E.P. package was used by early Intel Celeron processors, which have 242 contacts.


4.)PPGA Package Type
PPGA is short for Plastic Pin Grid Array, and these processors have pins that are inserted into a socket. To improve thermal conductivity, the PPGA uses a nickel plated copper heat slug on top of the processor. The pins on the bottom of the chip are staggered. In addition, the pins are arranged in a way that the processor can only be inserted one way into the socket. The PPGA package is used by early Intel Celeron processors, which have 370 pins.

5.)PGA Package Type


PGA is short for Pin Grid Array, and these processors have pins that are inserted into a socket. To improve thermal conductivity, the PGA uses a nickel plated copper heat slug on top of the processor. The pins on the bottom of the chip are staggered. In addition, the pins are arranged in a way that the processor can only be inserted one way into the socket. The PGA package is used by the Intel Xeon™ processor, which has 603 pins

CPU Socket


A CPU socket or CPU slot is a connector on a computer's motherboard that accepts a CPU and forms an electrical interface with it. As of 2007, most desktop and server computers, particularly those based on the Intel x86 architecture, include socketed processors.

Most CPU-sockets interfaces are based on the pin grid array (PGA) architecture, in which short, stiff pins on the underside of the processor package mate with holes in the socket. To minimize the risk of bent pins, zero insertion force (ZIF) sockets allow the processor to be inserted without any resistance, then grip the pins firmly to ensure a reliable contact after a lever is flipped.

As of 2007, several current and upcoming socket designs use land grid array (LGA) technology instead. In this design, it is the socket which contains pins. The pins contact pads or lands on the bottom of the processor package.

In the late 1990s, many x86 processors fit into slots, rather than sockets. CPU slots are single-edged connectors similar to expansion slots, into which a PCB holding a processor is inserted. Slotted CPU packages offered two advantages: L2 cache memory could be upgraded by installing an additional chip onto the processor PCB, and processor insertion and removal was often easier. However, slotted packages require longer traces between the CPU and chipset, and therefore became unsuitable as clock speeds passed 500 MHz. Slots were abandoned with the introduction of AMD's Socket A and Intel's Socket 370.

img src="

Thursday, January 17, 2008

Form Factors of Motherboard

From AT to BTX:
Motherboard Form Factors


You've probably heard the term motherboard a thousand times, but do you know what it really means and how it relates to the rest of your computer?
The form factor of a motherboard determines the specifications for its general shape and size. It also specifies what type of case and power supply will be supported, the placement of mounting holes, and the physical layout and organization of the board. Form factor is especially important if you build your own computer systems and need to ensure that you purchase the correct case and components.

The Succession of Motherboard Form Factors

AT & Baby AT
Prior to 1997, IBM computers used large motherboards. After that, however, the size of the motherboard was reduced and boards using the AT (Advanced Technology) form factor was released. The AT form factor is found in older computers (386 class or earlier). Some of the problems with this form factor mainly arose from the physical size of the board, which is 12" wide, often causing the board to overlap with space required for the drive bays.

Following the AT form factor, the Baby AT form factor was introduced. With the Baby AT form factor the width of the motherboard was decreased from 12" to 8.5", limiting problems associated with overlapping on the drive bays' turf. Baby AT became popular and was designed for peripheral devices — such as the keyboard, mouse, and video — to be contained on circuit boards that were connected by way of expansion slots on the motherboard.

Baby AT was not without problems however. Computer memory itself advanced, and the Baby AT form factor had memory sockets at the front of the motherboard. As processors became larger, the Baby AT form factor did not allow for space to use a combination of processor, heatsink, and fan. The ATX form factor was then designed to overcome these issues.
Key Terms To Understanding Motherboard Form Factors
motherboard
The main circuit board of a microcomputer.

form factor
The physical size and shape of a device. It is often used to describe the size of circuit boards.

AT
Short for advanced technology, the AT is an IBM PC model introduced in 1984.

ATX
The modern-day shape and layout of PC motherboards.

BTX
The BTX specification provides new tools and design space for developers to lay out desktop systems, whether designing small, compact systems or very large, expandable systems.

Baby AT
The form factor used by most PC motherboards prior to 1998.


ATX
With the need for a more integrated form factor which defined standard locations for the keyboard, mouse, I/O, and video connectors, in the mid 1990's the ATX form factor was introduced. The ATX form factor brought about many chances in the computer. Since the expansion slots were put onto separate riser cards that plugged into the motherboard, the overall size of the computer and its case was reduced. The ATX form factor specified changes to the motherboard, along with the case and power supply. Some of the design specification improvements of the ATX form factor included a single 20-pin connector for the power supply, a power supply to blow air into the case instead of out for better air flow, less overlap between the motherboard and drive bays, and integrated I/O Port connectors soldered directly onto the motherboard. The ATX form factor was an overall better design for upgrading.

micro-ATX
MicroATX followed the ATX form factor and offered the same benefits but improved the overall system design costs through a reduction in the physical size of the motherboard. This was done by reducing the number of I/O slots supported on the board. The microATX form factor also provided more I/O space at the rear and reduced emissions from using integrated I/O connectors.

LPX
White ATX is the most well-known and used form factor, there is also a non-standard proprietary form factor which falls under the name of LPX, and Mini-LPX. The LPX form factor is found in low-profile cases (desktop model as opposed to a tower or mini-tower) with a riser card arrangement for expansion cards where expansion boards run parallel to the motherboard. While this allows for smaller cases it also limits the number of expansion slots available. Most LPX motherboards have sound and video integrated onto the motherboard. While this can make for a low-cost and space saving product they are generally difficult to repair due to a lack of space and overall non-standardization. The LPX form factor is not suited to upgrading and offer poor cooling.

NLX
Boards based on the NLX form factor hit the market in the late 1990's. This "updated LPX" form factor offered support for larger memory modules, tower cases, AGP video support and reduced cable length. In addition, motherboards are easier to remove. The NLX form factor, unlike LPX is an actual standard which means there is more component options for upgrading and repair.

Many systems that were formerly designed to fit the LPX form factor are moving over to NLX. The NLX form factor is well-suited to mass-market retail PCs.

BTX
The BTX, or Balanced Technology Extended form factor, unlike its predecessors is not an evolution of a previous form factor but a total break away from the popular and dominating ATX form factor. BTX was developed to take advantage of technologies such as Serial ATA, USB 2.0, and PCI Express. Changes to the layout with the BTX form factor include better component placement for back panel I/O controllers and it is smaller than microATX systems. The BTX form factor provides the industry push to tower size systems with an increased number of system slots.

One of the most talked about features of the BTX form factor is that it uses in-line airflow. In the BTX form factor the memory slots and expansion slots have switched places, allowing the main components (processor, chipset, and graphics controller) to use the same airflow which reduces the number of fans needed in the system; thereby reducing noise. To assist in noise reduction BTX system level acoustics have been improved by a reduced air turbulence within the in-line airflow system.

Initially there will be three motherboards offered in BTX form factor. The first, picoBTX will offer four mounting holes and one expansion slot, while microBTX will hold seven mounting holes and four expansion slots, and lastly, regularBTX will offer 10 mounting holes and seven expansion slots. The new BTX form factor design is incompatible with ATX, with the exception of being able to use an ATX power supply with BTX boards.

Today the industry accepts the ATX form factor as the standard, however legacy AT systems are still widely in use. Since the BTX form factor design is incompatible with ATX, only time will tell if it will overtake ATX as the industry standard.

Thursday, December 13, 2007

Installation and Procedure Windows XP


NB: If rebuilding an existing, working computer, first:
- Backup all user data
- Write down all device information (names of cards etc.) and IP settings.

0. CMOS/BIOS SETTINGS (Hit DEL or F2 during startup, according to prompt)
Ensure that boot sequence is CD-ROM, Floppy, Hard Drive
Ensure that Plug-and-Play (PNP) OS is enabled

1a. If computer is incapable of booting from CDROM, then first prepare four install floppies, using CDROM. Boot from floppy, and it will prompt to load all four into RAM. (This procedure takes about 10 minutes.) Insert Windows 2000 Full Install CDROM.

1b. Otherwise, insert Windows 2000 Full Install CDROM and reboot.

2. Hit ENTER to install Windows 2000.

3. Hit C to continue.

4. Hit the F8 key to agree to license agreement.

5. Hit D to delete any existing disk partitions.

6. Hit C to create new partition.

7. Hit ENTER to accept the default (one big partition.) Note there may be some space left over. That’s OK.

8. ENTER to install windows on this partition.

9. ENTER to format the partition as NTFS.

10. Wait while the drive is formatted, files copied from the CD. The machine will reboot itself.

11. ENTER to accept locale and keyboard settings.

12. Type computer name and school name in the appropriate slots, hit ENTER.

13. Type the computer name. Type the Administrator password TWICE. Password will show as all asterisks. ENTER.

14. Modify the date, time and time zone as needed. ENTER.

15. Click to select “Custom settings”. ENTER.

16. Click to remove the check next to “File and Printer Sharing for Microsoft Networks”. ENTER.

17. Leave “This computer is not on a network or is on a network without a domain” selected (or if a PDC is available, selected the domain option). Type EPAHS in the Workgroup (or Domain) field. ENTER.

18. Remove CD from drive. ENTER.
Computer will reboot. ENTER.

19. Select “User must enter a user name and password to use this computer.” ENTER. ENTER again.

20. Log into computer as Administrator, using the password you entered in step 13. ENTER.

21. Disable the WELCOME Screen.

22. Double-click the “Connect to the Internet” icon on the desktop. Select “I want to set up my Internet connection manually, or I want to connect through a local area network (LAN).” OK.

23. Select “I connect through a local area network (LAN).” ENTER. ENTER again.

24. Select NO to setting up email. OK. OK again.

25. Right-click on “My Network Places”. Click Properties.
Right-click on “Local area network”. Click Properties.
Click on “Internet Protocol (TCP/IP)” so that it turns blue. Click Properties.
Select “Use the following IP address”.
Type in the IP address, subnet mask, gateway and DNS addresses you wrote down before. Click OK.


26. Change the Resolution (by right clicking on the desktop and selecting Properties:
24 bit True Color
800 x 600
Advanced -> Adapter -> Refresh Rate -> 75 Hz
YES ... OK ... OK ... OK ... (Joe Pesci mode)
Now adjust monitor physical wheels as needed.

27. Set the ScreenSaver to show the computer name:
Right-click on desktop, select Properties
-> Screensaver Tab
-> Text = “PC01 Welcome To EPAHS PC01”
-> Speed = Medium
-> Location = Random
-> Font = Terminal
-> Size = 72
Installation and Procedure Windows vista

SYMPTOMS
When you install a program on a Windows Vista-based computer, the installation procedure does not finish after the computer restarts.
Back to the top

CAUSE
This issue may occur if the following conditions are true: • The Setup program requires that a file or a folder be moved after the computer restarts.
• The file or the folder has been encrypted during installation. Typically, the Setup program has used the %temp% folder as a staging area. However, that folder is marked for encryption.
• When the Setup program tries to move the encrypted file after the computer restarts, the Local Security Authority (LSA) service is not ready. Therefore, the Encrypting File System (EFS) is not available.

Back to the top

WORKAROUND
To work around this issue, disable encryption on the %temp% folder, and then reinstall the program. To disable encryption on the %temp% folder in Windows Vista, follow these steps:1. Click Start, type run in the Search box, and then click Run under Programs.
2. Type %temp%, and then press ENTER.
3. In the Temp folder, click Properties on the Organize menu.
4. On the General tab, click Advanced.
5. Click to clear the Encrypt contents to secure data check box, and then click OK two times.
6. Click Apply the changes to this folder, subfolders and files, and then click OK.

Back to the top


--------------------------------------------------------------------------------

APPLIES TO
• Windows Vista Enterprise 64-bit edition
• Windows Vista Ultimate 64-bit edition
• Windows Vista Business
• Windows Vista Business 64-bit edition
• Windows Vista Enterprise
• Windows Vista Ultimate
Installation and Procedures of Windows 2000
NB: If rebuilding an existing, working computer, first:- Backup all user data- Write down all device information (names of cards etc.) and IP settings.
0. CMOS/BIOS SETTINGS (Hit DEL or F2 during startup, according to prompt)Ensure that boot sequence is CD-ROM, Floppy, Hard DriveEnsure that Plug-and-Play (PNP) OS is enabled


1a. If computer is incapable of booting from CDROM, then first prepare four install floppies, using CDROM. Boot from floppy, and it will prompt to load all four into RAM. (This procedure takes about 10 minutes.) Insert Windows 2000 Full Install CDROM.

1b. Otherwise, insert Windows 2000 Full Install CDROM and reboot.

2. Hit ENTER to install Windows 2000.

3. Hit C to continue.

4. Hit the F8 key to agree to license agreement.

5. Hit D to delete any existing disk partitions.

6. Hit C to create new partition.

7. Hit ENTER to accept the default (one big partition.) Note there may be some space left over. That’s OK.

8. ENTER to install windows on this partition.

9. ENTER to format the partition as NTFS.

10. Wait while the drive is formatted, files copied from the CD. The machine will reboot itself.


11. ENTER to accept locale and keyboard settings.

12. Type computer name and school name in the appropriate slots, hit ENTER.

13. Type the computer name. Type the Administrator password TWICE. Password will show as all asterisks. ENTER.


14. Modify the date, time and time zone as needed. ENTER.

15. Click to select “Custom settings”. ENTER.

16. Click to remove the check next to “File and Printer Sharing for Microsoft Networks”. ENTER.


17. Leave “This computer is not on a network or is on a network without a domain” selected (or if a PDC is available, selected the domain option). Type EPAHS in the Workgroup (or Domain) field. ENTER.

18. Remove CD from drive. ENTER.
Computer will reboot. ENTER.

19. Select “User must enter a user name and password to use this computer.” ENTER. ENTER again.

20. Log into computer as Administrator, using the password you entered in step 13. ENTER.

21. Disable the WELCOME Screen.

22. Double-click the “Connect to the Internet” icon on the desktop. Select “I want to set up my Internet connection manually, or I want to connect through a local area network (LAN).” OK.

23. Select “I connect through a local area network (LAN).” ENTER. ENTER again.

24. Select NO to setting up email. OK. OK again


25. Right-click on “My Network Places”. Click Properties.
Right-click on “Local area network”. Click Properties.
Click on “Internet Protocol (TCP/IP)” so that it turns blue. Click Properties.
Select “Use the following IP address”.
Type in the IP address, subnet mask, gateway and DNS addresses you wrote down before. Click OK.


26. Change the Resolution (by right clicking on the desktop and selecting Properties:
24 bit True Color
800 x 600
Advanced -> Adapter -> Refresh Rate -> 75 Hz
YES ... OK ... OK ... OK ... (Joe Pesci mode)
Now adjust monitor physical wheels as needed.

27. Set the ScreenSaver to show the computer name:
Right-click on desktop, select Properties
-> Screensaver Tab
-> Text = “PC01 Welcome To EPAHS PC01”
-> Speed = Medium
-> Location = Random
-> Font = Terminal
-> Size = 72
-> Wait = 10 minutes
-> Color = your choice
Energy Saver: Turn off monitor after 30 minutes

Tuesday, November 20, 2007

List of Windows OS


Windows CE (also known officially as Windows Embedded CE since version 6.0) [2] [3](and sometimes abbreviated WinCE) is a variation of Microsoft's Windows operating system for minimalistic computers and embedded systems. Windows CE is a distinctly different kernel, rather than a trimmed-down version of desktop Windows. It is not to be confused with Windows XP Embedded which is NT-based. It is supported on Intel x86 and compatibles, MIPS, ARM, and Hitachi SuperH processors.

Windows CE 3.0

Microsoft Windows CE 3.0 is an operating system (OS) designed for embedded systems including PDAs and mobile phones, working within the constraints of the slow processors and reduced amount of memory available on these devices. It can run on several different types of processor and has support for real time programming.

The successor to Windows CE 3.0 is Windows CE 4.0


Windows Mobile is a mobile platform, i.e. a mobile operating system combined with a suite of basic applications for mobile devices. It is sold by Microsoft and based on Microsoft's Windows CE.

Windows CE 5.0

Windows CE 5.0 is a successor to Windows CE 4.2, the third release in the Windows CE .NET family. Windows CE 5.0 like its predecessors is marketed towards the embedded device market and independent device vendors. Windows CE 5.0 is billed as a low-cost, small footprint, fast-to-market, real-time operating system available for x86, ARM, MIPS, and SuperH microprocessor-based systems. Windows CE 5.0 builds upon previous Windows CE releases in its adoption of shared source. Since 2001 Microsoft have been steadily expanding the available Windows CE source tree with embedded system developers. Windows CE 5.0 is the most open Microsoft Operating System to date, though not all of the system is available under shared source agreements. Developers have the freedom to modify down to the kernel level, without the need to share their changes with Microsoft or competitors.

On the x86 platform, Windows CE 5.0 competes against Microsoft's other embedded Operating Systems, Windows XP Embedded and its predecessor Windows NT Embedded.

Windows 1.0


Windows 1.0 is a 16-bit graphical operating environment released on November 20, 1985. It was Microsoft's first attempt to implement a multi-tasking graphical user interface-based operating environment on the PC platform.

Windows 2.0

Windows 2.0 is a version of the Microsoft Windows graphical user interface-based operating environment that superseded Windows 1.0.

Windows 3.0

Windows 3.0 is the third major release of Microsoft Windows, and came out on May 22, 1990. It became the first widely successful version of Windows (see history of Microsoft Windows) and a powerful rival to Apple Macintosh and the Commodore Amiga on the GUI front. It was succeeded by Windows 3.1.

Windows 3.1x


Windows 3.1x is a graphical user interface and a part of the Microsoft Windows software family. Several editions were released between 1992 and 1994, succeeding Windows 3.0. This family of Windows can run in either Standard or 386 Enhanced memory modes. The exception is Windows for Workgroups 3.11, which can only officially run in 386 Enhanced mode.

Windows 95

Windows 95 is a consumer-oriented graphical user interface-based operating system. It was released on August 24, 1995 by Microsoft, and was a significant progression from the company's previous Windows products. During development it was referred to as Windows 4.0 or by the internal codename Chicago.

Windows 95 was intended to integrate Microsoft's formerly separate MS-DOS and Windows products and includes an enhanced version of DOS, often referred to as MS-DOS 7.0. It features significant improvements over its predecessor, Windows 3.1, most visibly the graphical user interface (GUI) whose basic format and structure is still used in later versions such as Windows Vista. There were also large changes made to the underlying workings, including support for 255-character mixed-case long filenames and preemptively multitasked protected-mode 32-bit applications. Whereas its predecessors are optional "operating environments" requiring the MS-DOS operating system (usually available separately), Windows 95 is a consolidated operating system, which was a significant marketing change.


Windows 98 (codenamed Memphis) is a graphical operating system released on June 25, 1998 by Microsoft and the successor to Windows 95. Like its predecessor, it is a hybrid 16-bit/32-bit monolithic product based on MS-DOS.

The first edition of Windows 98 is designated by the internal version number 4.10.1998, or 4.10.1998A if it has been updated with the Security CD from Microsoft. Windows 98 Second Edition is designated by the internal version number 4.10.2222A, or 4.10.2222B if it has been updated with the Security CD from Microsoft. The successor to Windows 98 is Windows Me.

Windows Me

Windows Millennium Edition, or Windows Me (IPA pronunciation: [miː], [ɛm iː]), is a hybrid 16-bit/32-bit graphical operating system released on September 14, 2000 by Microsoft.[2] It was originally codenamed Millennium.


Windows NT

Windows NT (New Technology) is a family of operating systems produced by Microsoft, the first version of which was released in July 1993. It was originally designed to be a powerful high-level-language-based, processor-independent, multiprocessing, multiuser operating system with features comparable to Unix. It was intended to complement consumer versions of Windows that were based on MS-DOS. NT was the first fully 32-bit version of Windows, whereas its consumer-oriented counterparts, Windows 3.1x and Windows 9x, were 16-bit/32-bit hybrids. Windows 2000, Windows XP, Windows Server 2003, Windows Vista, Windows Server 2008 (beta), and Windows Home Server are based upon the Windows NT system, although they are not branded as Windows NT.

Windows NT 3.1

Windows NT 3.1 is the first release of Microsoft's Windows NT line of server and business desktop operating systems, and was released to manufacturing on July 27, 1993. The version number was chosen to match the one of Windows 3.1, the then-latest GUI from Microsoft, on account of the similar visual appearance of the user interface. Two editions of NT 3.1 were made available, Windows NT 3.1 and Windows NT Advanced Server.

It could run on Intel x86, DEC Alpha, and MIPS R4000 CPUs.

Windows NT 3.5

Windows NT 3.5 is the second release of the Microsoft Windows NT operating system. It was released on September 21, 1994.

One of the primary goals during Windows NT 3.5's development was to increase the speed of the operating system; as a result, the project was given the codename "Daytona" in reference to the Daytona International Speedway in Daytona Beach, Florida.[1]

Windows NT 3.51

Windows NT 3.51 is the third release of Microsoft's Windows NT line of operating systems. It was released on May 30, 1995, nine months after Windows NT 3.5. The release provided two notable feature improvements; firstly NT 3.51 was the first of a short-lived outing of Microsoft Windows on the PowerPC CPU architecture. The second most significant enhancement offered through the release was that it provides client/server support for interoperating with Windows 95, which was released three months after NT 3.51. Windows NT 4.0 became its successor a year later; Microsoft continued to support 3.51 until December 31, 2001.

Windows NT 4.0


Windows NT 4.0 is a preemptive, graphical and business-oriented operating system designed to work with either uniprocessor or symmetric multi-processor computers. It is the fourth release of Microsoft's Windows NT line of operating systems and was released to manufacturing on July 29, 1996. It is a 32-bit Windows system available in both workstation and server editions with a graphical environment similar to that of Windows 95. The "NT" designation in the product's title initially stood for "New Technology" according to Microsoft's then-CEO Bill Gates, but now no longer has any specific meaning. Windows NT 4.0 was succeeded by Windows 2000 in February 2000. Windows NT 4.0 is classified as a hybrid kernel operating system.

While providing greater stability than Windows 95, it was also less flexible from a desktop perspective. Much of the stability is gained by virtualising the hardware and having software applications access the system APIs rather than the hardware directly as was done in DOS-based versions, including Windows 95, 98, 98SE, and Me. The trade-off is that writing to the APIs rather than hardware directly requires much more work be done by the computer and so hardware intensive applications such as games run much slower. While many programs written for the Win32 API will run on both Windows 95 and Windows NT, the majority of 3D games will not, due in part to NT 4.0 having limited support for DirectX.

Windows NT 4.0 is also less user-friendly than Windows 95 when it comes to certain maintenance and management tasks; there is, for instance, no device management overview of the PC's hardware.

The dichotomy between the NT and "9x" lines of Windows ended with the arrival of Windows XP, by which time the gaming APIs—such as OpenGL and DirectX—had matured sufficiently to be more efficient to write for than common PC hardware and the hardware itself had become powerful enough to handle the API processing overhead acceptably.

Windows NT 4.0 was the last major release of NT to support the Alpha, MIPS or PowerPC CPU architectures. Windows NT 4.0 was rendered obsolete with the advent of Windows 2000 but is still (as of 2005) in widespread use despite Microsoft's many efforts to persuade customers to upgrade to more recent versions. It was also the last release in the Windows NT line to use the "Windows NT" name. NT 4.0 is the last Windows NT Server OS to use the now discontinued BackOffice feature.


Windows 2000 (also referred to as Win2K) is a preemptive, interruptible, graphical and business-oriented operating system designed to work with either uniprocessor or symmetric multi-processor computers. It is part of the Microsoft Windows NT line of operating systems and was released on February 17, 2000. It was succeeded by Windows XP in October 2001 and Windows Server 2003 in April 2003. Windows 2000 is classified as a hybrid kernel operating system.

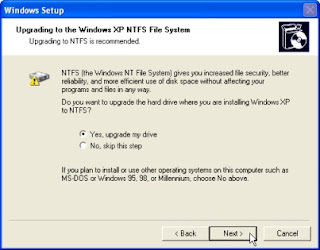
Windows 2000 was made available in four editions: Professional, Server, Advanced Server, and Datacenter Server. Additionally, Microsoft offered Windows 2000 Advanced Server Limited Edition and Windows 2000 Datacenter Server Limited Edition, which were released in 2001 and run on 64-bit Intel Itanium microprocessors.[4] Whilst all editions of Windows 2000 are targeted to different markets, they each share a core set of common functionality, including many system utilities such as the Microsoft Management Console and standard system administration applications. Support for people with disabilities was improved over Windows NT 4.0 with a number of new assistive technologies, and Microsoft included increased support for different languages and locale information. All versions of the operating system support the Windows NT filesystem, NTFS 3.0,[5] the Encrypting File System, as well as basic and dynamic disk storage. The Windows 2000 Server family has additional functionality, including the ability to provide Active Directory services (a hierarchical framework of resources), Distributed File System (a file system that supports sharing of files) and fault-redundant storage volumes. Windows 2000 can be installed and deployed to corporate desktops through either an attended or unattended installation. Unattended installations rely on the use of answer files to fill in installation information, and can be performed through a bootable CD using Microsoft Systems Management Server, by the System Preparation Tool. Windows 2000 is the last NT-kernel based version of Microsoft Windows that does not include Windows Product Activation.

At the time of its release, Microsoft marketed Windows 2000 as the most secure Windows version they had ever shipped,[6] however it became the target of a number of high-profile virus attacks such as Code Red and Nimda. More than seven years after its release, it continues to receive patches for security vulnerabilities on a near-monthly basis.


Windows XP is a line of operating systems developed by Microsoft for use on general-purpose computer systems, including home and business desktops, notebook computers, and media centers. The letters "XP" stand for eXPerience.[2] It was codenamed "Whistler", after Whistler, British Columbia, as many Microsoft employees skied at the Whistler-Blackcomb ski resort during its development. Windows XP is the successor to both Windows 2000 Professional and Windows Me, and is the first consumer-oriented operating system produced by Microsoft to be built on the Windows NT kernel and architecture. Windows XP was first released on October 25, 2001, and over 400 million copies were in use in January 2006, according to an estimate in that month by an IDC analyst.[3] It is succeeded by Windows Vista, which was released to volume license customers on November 8, 2006, and worldwide to the general public on January 30, 2007.

The most common editions of the operating system are Windows XP Home Edition, which is targeted at home users, and Windows XP Professional, which has additional features such as support for Windows Server domains and two physical processors, and is targeted at power users and business clients. Windows XP Media Center Edition has additional multimedia features enhancing the ability to record and watch TV shows, view DVD movies, and listen to music. Windows XP Tablet PC Edition is designed to run the ink-aware Tablet PC platform. Two separate 64-bit versions of Windows XP were also released, Windows XP 64-bit Edition for IA-64 (Itanium) processors and Windows XP Professional x64 Edition for x86-64.

Windows XP is known for its improved stability and efficiency over the 9x versions of Microsoft Windows. It presents a significantly redesigned graphical user interface, a change Microsoft promoted as more user-friendly than previous versions of Windows. New software management capabilities were introduced to avoid the "DLL hell" that plagued older consumer-oriented 9x versions of Windows. It is also the first version of Windows to use product activation to combat software piracy, a restriction that did not sit well with some users and privacy advocates. Windows XP has also been criticized by some users for security vulnerabilities, tight integration of applications such as Internet Explorer and Windows Media Player, and for aspects of its default user interface.

Windows XP had been in development since early 1999, when Microsoft started working on Windows Neptune, an operating system intended to be the "Home Edition" equivalent to Windows 2000 Professional. It was eventually merged into the Whistler project, which later became Windows XP.

Windows Server 2003

Windows Server 2003 is a server operating system produced by Microsoft. Introduced on April 24, 2003 as the successor to Windows 2000 Server, it is considered by Microsoft to be the cornerstone of their Windows Server System line of business server products.

According to Microsoft, Windows Server 2003 is more scalable and delivers better performance than its predecessor, Windows 2000.[1]

Windows Fundamentals for Legacy PCs

Windows Fundamentals for Legacy PCs ("WinFLP") is an operating system from Microsoft, based on Windows XP, but optimized for older, less powerful hardware. It was released on July 8, 2006.


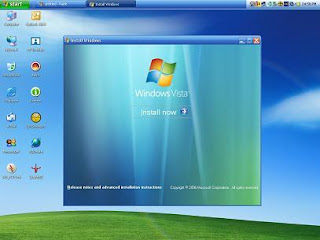
Windows Vista (IPA: /ˈvɪs.tə/) is a line of graphical operating systems used on personal computers, including home and business desktops, laptops, Tablet PCs, and media centers. Prior to its announcement on July 22, 2005, Windows Vista was known by its codename "Longhorn".[1] Development was completed on November 8, 2006; over the following three months it was released in stages to computer hardware and software manufacturers, business customers, and retail channels. On January 30, 2007, it was released worldwide to the general public,[2] and was made available for purchase and downloading from Microsoft's web site.[3] The release of Windows Vista comes more than five years after the introduction of its predecessor, Windows XP, making it the longest time span between two releases of Microsoft Windows.

Windows Vista contains hundreds of new and reworked features; some of the most significant include an updated graphical user interface and visual style dubbed Windows Aero, improved searching features, new multimedia creation tools such as Windows DVD Maker, and completely redesigned networking, audio, print, and display sub-systems. Vista also aims to increase the level of communication between machines on a home network using peer-to-peer technology, making it easier to share files and digital media between computers and devices. For developers, Vista includes version 3.0 of the .NET Framework, which aims to make it significantly easier for developers to write applications than with the traditional Windows API.

Microsoft's primary stated objective with Windows Vista, however, has been to improve the state of security in the Windows operating system.[4] One common criticism of Windows XP and its predecessors has been their commonly exploited security vulnerabilities and overall susceptibility to malware, viruses and buffer overflows. In light of this, Microsoft chairman Bill Gates announced in early 2002 a company-wide "Trustworthy Computing initiative" which aims to incorporate security work into every aspect of software development at the company. Microsoft stated that it prioritized improving the security of Windows XP and Windows Server 2003 above finishing Windows Vista, thus delaying its completion.[5]

Windows Vista is the target of a number of negative assessments by various groups. Criticisms of Windows Vista include protracted development time, more restrictive licensing terms, the inclusion of a number of new Digital Rights Management technologies aimed at restricting the copying of protected digital media, lack of device drivers for some hardware, and the usability of other new features such as User Account Control.

Windows Server 2008

Windows Server 2008 is the next server operating system from Microsoft. It is the successor to Windows Server 2003. Windows Server 2008 introduces most of the new features from Windows Vista to Windows Server. This is a similar relationship to that between Windows Server 2003 and Windows XP.

It was known as Windows Server Codename "Longhorn" until May 16, 2007, when Bill Gates announced its official title during his keynote address at WinHEC.[1]

Beta 1 was released on July 27, 2005. Beta 2 was announced and released on May 23, 2006 at WinHEC 2006, Beta 3 was released publicly on April 25, 2007[2] and Release Candidate 0 was released to the general public on September 24, 2007[3]. Windows Server 2008 will be released to manufacturing in the first quarter of 2008 with the official launch taking place on February 27, 2008

Windows 7

Windows 7 (formerly codenamed Blackcomb, then Vienna) is a future version of Microsoft Windows. It is expected to be the successor to Windows Vista. Microsoft has confirmed that the planned development time frame is at least three years, putting the release date around 2010[1]. On July 20, 2007, Microsoft confirmed that Windows 7 is "the internal name for the next version of the Windows Client OS".[1]

Microsoft has refrained from discussing the details about Windows 7 publicly as they focus on the release and marketing of Windows Vista,[2] though some early details of various core operating system features have emerged at developer conferences such as Windows Hardware Engineering Conference in 2006[citation needed].

Windows Preinstallation Environment


Windows Preinstallation Environment (WinPE) is a lightweight version of Windows XP, Windows Server 2003 or Windows Vista that is used for the deployment of workstations and servers by large corporations. It is also used by OEMs to preinstall Windows client operating systems to PCs during manufacturing. It can also be used as an alternative to MS-DOS as an OS by booting from a CD or USB flash drive instead of booting from a floppy or hard disk.