NB: If rebuilding an existing, working computer, first:
- Backup all user data
- Write down all device information (names of cards etc.) and IP settings.
0. CMOS/BIOS SETTINGS (Hit DEL or F2 during startup, according to prompt)
Ensure that boot sequence is CD-ROM, Floppy, Hard Drive
Ensure that Plug-and-Play (PNP) OS is enabled
1a. If computer is incapable of booting from CDROM, then first prepare four install floppies, using CDROM. Boot from floppy, and it will prompt to load all four into RAM. (This procedure takes about 10 minutes.) Insert Windows 2000 Full Install CDROM.
1b. Otherwise, insert Windows 2000 Full Install CDROM and reboot.
2. Hit ENTER to install Windows 2000.
3. Hit C to continue.
4. Hit the F8 key to agree to license agreement.
5. Hit D to delete any existing disk partitions.
6. Hit C to create new partition.
7. Hit ENTER to accept the default (one big partition.) Note there may be some space left over. That’s OK.
8. ENTER to install windows on this partition.
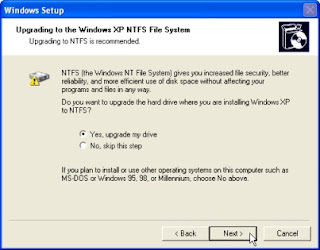
9. ENTER to format the partition as NTFS.
10. Wait while the drive is formatted, files copied from the CD. The machine will reboot itself.
11. ENTER to accept locale and keyboard settings.
12. Type computer name and school name in the appropriate slots, hit ENTER.
13. Type the computer name. Type the Administrator password TWICE. Password will show as all asterisks. ENTER.
14. Modify the date, time and time zone as needed. ENTER.
15. Click to select “Custom settings”. ENTER.
16. Click to remove the check next to “File and Printer Sharing for Microsoft Networks”. ENTER.
17. Leave “This computer is not on a network or is on a network without a domain” selected (or if a PDC is available, selected the domain option). Type EPAHS in the Workgroup (or Domain) field. ENTER.
18. Remove CD from drive. ENTER.
Computer will reboot. ENTER.
19. Select “User must enter a user name and password to use this computer.” ENTER. ENTER again.
20. Log into computer as Administrator, using the password you entered in step 13. ENTER.
21. Disable the WELCOME Screen.
22. Double-click the “Connect to the Internet” icon on the desktop. Select “I want to set up my Internet connection manually, or I want to connect through a local area network (LAN).” OK.
23. Select “I connect through a local area network (LAN).” ENTER. ENTER again.
24. Select NO to setting up email. OK. OK again.
25. Right-click on “My Network Places”. Click Properties.
Right-click on “Local area network”. Click Properties.
Click on “Internet Protocol (TCP/IP)” so that it turns blue. Click Properties.
Select “Use the following IP address”.
Type in the IP address, subnet mask, gateway and DNS addresses you wrote down before. Click OK.
26. Change the Resolution (by right clicking on the desktop and selecting Properties:
24 bit True Color
800 x 600
Advanced -> Adapter -> Refresh Rate -> 75 Hz
YES ... OK ... OK ... OK ... (Joe Pesci mode)
Now adjust monitor physical wheels as needed.
27. Set the ScreenSaver to show the computer name:
Right-click on desktop, select Properties
-> Screensaver Tab
-> Text = “PC01 Welcome To EPAHS PC01”
-> Speed = Medium
-> Location = Random
-> Font = Terminal
-> Size = 72
Installation and Procedure Windows vista
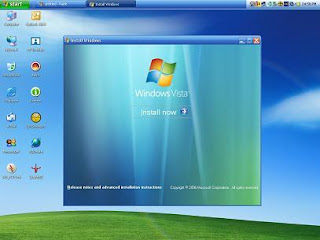
SYMPTOMS
When you install a program on a Windows Vista-based computer, the installation procedure does not finish after the computer restarts.
Back to the top
CAUSE
This issue may occur if the following conditions are true: • The Setup program requires that a file or a folder be moved after the computer restarts.
• The file or the folder has been encrypted during installation. Typically, the Setup program has used the %temp% folder as a staging area. However, that folder is marked for encryption.
• When the Setup program tries to move the encrypted file after the computer restarts, the Local Security Authority (LSA) service is not ready. Therefore, the Encrypting File System (EFS) is not available.
Back to the top
WORKAROUND
To work around this issue, disable encryption on the %temp% folder, and then reinstall the program. To disable encryption on the %temp% folder in Windows Vista, follow these steps:1. Click Start, type run in the Search box, and then click Run under Programs.
2. Type %temp%, and then press ENTER.
3. In the Temp folder, click Properties on the Organize menu.
4. On the General tab, click Advanced.
5. Click to clear the Encrypt contents to secure data check box, and then click OK two times.
6. Click Apply the changes to this folder, subfolders and files, and then click OK.
Back to the top
--------------------------------------------------------------------------------
APPLIES TO
• Windows Vista Enterprise 64-bit edition
• Windows Vista Ultimate 64-bit edition
• Windows Vista Business
• Windows Vista Business 64-bit edition
• Windows Vista Enterprise
• Windows Vista Ultimate


